Wednesday, December 21, 2011

Cheddar Cheese


I love, love, love cheese.  And if I had to pick a favorite...well...gosh...I just couldn’t.  There are so many wonderful varieties out there, from pungent, creamy blues like Roquefort and Stilton to decadent triple crème brie to tangy goat varieties like Bucheron or Humboldt Fog to nutty and mild Port Salut to Belgian Trappist  cheeses made with beer to...well, I could go on and on.  But it’s hard to beat a great cheddar cheese.
    
The problem with cheddar is that it has become so ubiquitous that it could be considered the ‘Merlot’ of cheeses.  It’s the default cheese, the common denominator, the rule instead of the exception, and thus cheddar becomes, in many cases, marginalized, bland, and about as exciting as a slice of plain white bread.   The good thing about cheddar is you can find is practically anywhere.  The bad thing is the bulk of what is out there in our supermarkets and even specialty stores is often homogenized and practically tasteless.  But don’t let this sully your opinion of cheddar.  When created carefully and aged appropriately, cheddar can be one of the world’s great cheeses. 


Cheddar cheese of course originated around the village named Cheddar in England, and it is still made there.  Since the appellation ‘Cheddar’ is not controlled like the names of some other cheeses, it can be difficult to find cheddar from Cheddar, but there are many fine English cheeses that are similar that can be found in specialty cheese shops or places like Whole Foods or Central Market.  Some of these cheeses are Red Leister, Single or Double Gloucester, Derbyshire, or Cheshire.  Before cheese purists run me up on charges, let me stress that I’m not asserting that these cheeses are cheddar, but merely that they are similar enough in character as to satisfy someone looking for ‘authentic’ cheddar from the eponymous village.  

Good cheddar is also made in the United States.  Vermont is famous for its white cheddars, and many are quite good, but with popularity comes surplus, and then surfeit, meaning that there are so many ‘Vermont cheddars’ on the market today that many are bland and unexciting.  Look for VC’s that are well aged at least a year and half, and try to find a cheese monger who will let you taste their wares first.  (Good advice no matter what sort of cheese you are buying).

Wisconsin is of course the center of cheese production in the States, and thus produces the bulk of the cheddar that is made here, and unfortunately, this is where much of the unexciting stuff comes from.  But I have to say that hands down the best cheddar I ever tasted also comes from Wisconsin.  This is a cheddar created by the Wisconsin Cheese Mart that is aged an astounding NINE YEARS before it is sold.  


I discovered it by accident.  I was on a business trip to Milwaukee and had some time to kill, so I wandered into their store.  I ended up coming out with several pounds of cheese to take back home, including a brick of this amazing nine-year-old stuff. 

Never have I tasted a cheddar cheese like this before.  The flavor is rich and almost overpowering, the sharpest, tangiest cheese you’ve ever tasted.  I would compare tasting a bite of this cheese to the depth of flavor one finds in a bite of a steak from the finest steakhouse in the land.   And it’s not just the flavor that is a part of the experience, but the texture as well.  All this aging causes it to be crumbly, but somehow there is still a fair amount of moisture content in this cheese, giving a creaminess to the texture.  As you bite into it, you discover a delightful, subtle crunch as well, as there are tiny granular crystals (calcium lactate) that have formed in the cheese.


So if you want to try cheddar cheese at its true best, check out the Wisconsin Cheese Mart.  I’ve ordered several of their cheeses by mail order over the years, and they always arrive in great shape.  I checked the website, and they are currently out of the nine-year-old cheddar, but they have a seven-year-old version that I’ve tried and it is comparable to the nine year version. 

Until next time, 

Stay Cheesy,

Chris


Monday, November 21, 2011

My Thanksgiving Turkey Recipe


Thanksgiving is almost here. It’s perhaps my favorite holiday these days, as it’s all about the food, family, and (thanks to the Cowboys playing) football. But of course it all starts with the guest of honor, the turkey.


We have a big family, so when I have Thanksgiving at my house, I always cook at least two, and sometimes three turkeys. The first year I hosted Thanksgiving, I only cooked one turkey, and after the meal it was almost all gone. And what’s Thanksgiving without leftovers! Doing multiple turkeys means there will be plenty for folks to nibble on later in the day, and to take home as well for those next day turkey sandwiches.

I’ve been known to fire up the smoker and smoke a whole turkey on T-day, and I also am a fan of fried turkey, so one of those usually makes an appearance as well. But I never fail to do an oven-roasted turkey as well, and that’s the recipe we’ll be discussing today. I simply love the flavor of an oven-roasted bird, and the aroma it sends wafting though the house is to die for! Also, with its beautiful, crisp, brown skin, it makes a perfect centerpiece on the table.

The recipe that I follow for my roast turkey is one with a simple herb butter application that really crisps the skin and makes the bird look beautiful and taste great. I’ve also thrown in my wife’s stuffing and gravy recipes, since no bird is complete without those two items.

Roast Turkey with Herb Butter

1 large turkey, thawed, giblets and neck reserved for gravy
1 stick butter
3 tablespoons chopped fresh rosemary
3 tablespoons chopped fresh sage
1 ½ tablespoons orange zest
1 tablespoon ground black pepper
4 teaspoons salt

Preheat oven to 325F. Rinse turkey inside and out, pat dry. Place on rack in roasting pan. Sprinkle cavities with salt and pepper. If not stuffing turkey, place rosemary and sage sprigs in main cavity. If stuffing turkey, spoon stuffing loosely into main cavity.

(And of course by spoon, I mean, you can use your hands, like my wife does here)

For the herb butter, melt the stick of butter in a saucepan. Mix in the chopped rosemary, sage, orange zest, pepper and salt.


Brush herb butter on over turkey.


Tuck wing tips under turkey, tie legs together to hold shape.


Roast Turkey one hour. Baste with pan juices. Continued roasting turkey until thermometer inserted in thigh registers 180F, basting every 20 minutes, about 2 ½ hours more if unstuffed, or about 3 ¼ hours longer if stuffed.


After the turkey is finished, place on a platter, garnish with rosemary sprigs or what have you, and admire. Then eat. Don’t forget to make the Gravy. Stuffing recipe can be found here.


Happy Thanksgiving, y’all!


Chris

Turkey Gravy


Turkey Gravy


4 parts chicken broth
1 part turkey pan drippings
1 part giblet/neck stock
½ part flour
Salt and pepper to taste

While your turkey is roasting, simmer the neck and giblets in water to make giblet stock. (You can add a little chopped onion, carrot and celery, as well as some garlic, to the pot for extra flavor) After your turkey is finished roasting, heat the pan drippings in a frying pan until hot. Sprinkle or sift flour into the pan and brown. Add the chicken broth and giblet stock and simmer for 20 minutes or so. Salt and pepper to taste.

Thanksgiving Stuffing


I’m no master of stuffing, and in fact, I’ve always left the preparation of it to my sisters or my wife, except back in the bachelor days when I’d simply prepare a small amount to go in the bird itself. But my family is crazy about stuffing, or ‘dressing,’ as they call it, because we always grew up as a family that cooked the stuffing in a separate pan instead of in the bird. (I stuff the bird now, because I’m a traditionalist, but we always make a pan or two of ‘dressing’ so there’s plenty to go around)


I wanted to include a stuffing recipe here to go along with my turkey, but since I don’t have must experience with the dish, I’ve had to defer to my wife, who has presented me with her Grandmother’s stuffing recipe, which I’ve transcribed for you below.

Dressing

1 loaf dry bread (I usually bake a French or Italian loaf a few days earlier, and let it stale up)
2 eggs, beaten
½ stick butter
1 medium onion, chopped
3 large celery sticks, chopped
1 ½ tablespoons chopped fresh sage
Salt and pepper
Water or giblet stock

Cut the bread in cubes and place in a large bowl. Pour the beaten eggs over the bread and mix. Melt the butter and fry the onion and celery until soft but not brown. Add the sage, stir and cook for a minute. Salt and pepper to taste. Add the water or giblet stock and let boil for a couple minutes. Then pour this liquid over the bread and mix up good. Add the mixture to the turkey cavity, or if desired, add it to a baking dish and bake for 30 minutes at 350F.

Sunday, October 30, 2011

Chicken Tikka Masala


I discovered this dish quite by accident. I was at an Indian restaurant in New Hampshire last summer, and I ordered one of my favorite dishes, Chicken Tikka. They made a slight mistake in writing down the order, and brought me instead Chicken Tikka Masala, which is Chicken Tikka covered in a Masala sauce. I’d never tried this sauce before, so instead of sending it back, I told them to leave it and I’d give it a try. Well, I fell in love with this dish! The Masala sauce was tangy, creamy and rich, and I couldn’t get enough of it. After I’d finished the chicken, I made sure to finish off the sauce by swabbing it up with an order of Naan bread.


I went back to this restaurant several more times, and each time I had to order the Chicken Tikka Masala, or else one of their lamb dishes covered in the Masala sauce. I’ve since tried this at my favorite Indian restaurant here in Texas, the Tandoor, and found I love their version as well.

I knew I had to figure out how to make this sauce at home, so I began researching recipes and tried various versions until I got what came closest to the dish that I had in New Hampshire. As I did so, I noticed that there were a great variety of Masala recipes out there. The signature spice that was present in all of them was Garam Masala, a spice blend that you can pick up at any Indian Grocery store. Some of the recipes had tomatoes in them, but a lot of them didn’t. But, the version I’d had that I fell in love with definitely had tomatoes, so I made sure to include a puree of them as the base of the sauce. A lot of the recipes also had a wild array of spices in it, and the first few versions I made were quite garish and over-spiced. When I simplified and streamlined the recipe down a bit, I finally had a sauce that matched the one I had fallen in love with. I hope you’ll like it too.


Chicken Tikka Masala

2 Chicken breasts, cut into chunks
6 oz Plain Yogurt
1 tblsp Chili Powder
1 tblsp Granulated Garlic
1 tsp Ground Cumin
½ tsp Ground Ginger


Masala Sauce

2 14 oz cans tomato puree
2 tblsp extra virgin olive oil
2 tsp garam masala
2 tsp paprika
2 tsp kosher salt
1 cup heavy cream

First, make the Chicken Tikka. Cut two chicken breasts into bite sized chunks.


Set aside.


In a bowl mix the yogurt, chili powder, garlic, cumin and ginger together thoroughly. Place the chicken breast chunks into a large freeze bag, then spoon the marinade over them, tossing and kneading the bag to mix. Let this marinate for up to eight hours.

When you’re ready to cook the chicken, place it evenly spaced on skewers...


...and grill over a hot charcoal fire, turning so that it browns evenly. You could also do the chicken under your broiler in your oven, but I think the charcoal grill will give you the best results.


Masala Sauce


This can be made ahead of time as well, but it is best served hot.


Pour the two cans of tomato puree into a large sauce pan over medium heat. Add the olive oil, garam masala, paprika, and salt and let simmer for 15-20 minutes. Just before serving, stir in the cream and let simmer for a few minutes to heat through.

Once the cream is in, the sauce takes on a lovely orange color. 

Here we’ve served the Chicken Tikka Masala with some simple jasmine rice. The sauce also goes quite well with lamb dishes.


Until next time,

Stay Spicy!

Chris

Friday, September 30, 2011

Red Chile Sauce


This time of year is Hatch chile season. Well, actually, we’re just a little past it, but I’m a bit late in getting this article online. Consider this my September article.

Hatch chiles are famous just about the world over for their unique piquant flavor and aroma. They are most used in their green form (see my entry on Green Chili Stew for an example) but if they are left on the plant they will mature into red chiles. These are usually hung in bunches called ristras (As in the picture above) and left to dry, the dried chiles then being ground as needed and used to season various dishes.

Finding fresh RED Hatch chiles is usually pretty rare unless one is in New Mexico, but I happened across some at Central Market the other day and I couldn’t resist picking up a pound and doing something with them.


I love the flavor of fresh chiles, so I decided I’d make a red chile sauce with these babies. Most red chile sauce recipes call for dried chiles, because as mentioned above that is usually the only way you can find them. To work with the fresh chiles, I sort of made a hybrid between the green chile and red chile recipies I had in my Whole Chile Pepper Cookbook.


Red Chile Sauce


1 lb Fresh Red Hatch Chiles, Roasted, Peeled and Chopped
1 Medium Onion
2 Cloves Garlic
2 Tablespoons Vegetable or Olive Oil
¼ Cup Flour
2 Tablespoons Paprika
1 Tablespoon Cumin
½ to 1 Cup Water

First, roast the chiles on your grill until they begin to blacken and blister, about five minutes a side.


Enjoy their fragrant aroma. Remove the chiles from the grill and place in a plastic bag for about 15 minutes. This will sweat them and make their skins much easier to remove.

Chop your onion and get it simmering in your oil. (Vegetable oil is traditional, but I use olive oil) while your chiles are sweating in the plastic bag. (You can also roast the chiles at an earlier time and store them in the fridge for a couple of days, or freeze them for longer).

Note how easily the chiles peel, once they have sweated in the bag. 

Peel the chiles and coarsely chop them. Set aside. When the onions have begun to brown, dice the garlic and add it to the onions. Next sift in the flour and stir.

Next, add the paprika and cumin and stir this in. Add the chopped red chiles and allow the mixture to simmer for a few minutes.


Then add the water and allow it to come to a boil, then reduce the heat and simmer for 15 minutes or so. Serve Immediately.

Here we've served the sauce over some homemade cheese enchiladas.  Mmm Mmm good. 

Chris

Tuesday, August 23, 2011

The Best Mashed Potatoes You've Ever Tasted


Usually I’m a bit more modest than this, but I do believe that this recipe produces the best mashed potatoes I’ve ever tasted, and usually get comments to the same by everyone who tries them. Here’s how it all came about.


Long about fifteen years ago, I ate dinner at a little place in Roanoke called “Babe’s Chicken Dinner House.”


They’re still around—give ‘em a try some time. Best Fried Chicken ever! They also had what were the best mashed potatoes that I had ever tasted at the time. They were creamy, tangy, savory, buttery and succulent, and probably a few more adjectives as well. Now I loved mashed potatoes, but I knew I couldn’t keep making the drive to Roanoke every few days, so I had to figure out how to make these spuds.

No good asking the restaurant. They weren’t budging on their secret recipe. So I went home and started peeling potaters, and I made about ten batches in my attempt to reverse engineer the spuds. I tried all sorts of things that I thought Babe’s might be using: I tried sour cream. chicken broth. ranch dressing. A few other things I don’t remember. These made for some interesting spuds, but they weren’t “The Best Mashed Potatoes I’d Ever Tasted.”

So I kept at it. I read various cookbooks and tried various recipes and devices to improve my potatoes. I tried all different types of potatoes, from Russet to Yukon Gold to Red to White to Wax to several more. I learned a lot about potatoes, and made some good spuds, but still no “Best Ever.”

The key secret ingredient that had been eluding me was yet to be found, but it was eventually discovered, although not by me. That honor goes to my girlfriend at the time (and now my wife). I had taken her to Babes on a date, and I mentioned my quest to match their potatoes in greatness. She suggested what I might try, and oh my friends, let me tell you I was taken aback. Yes, it was a condiment, certainly--one intended for sandwiches and salads, but it seemed a weird thing to add to mashed potatoes.  Yes, I'm talking about Mayonnaise.  But, I decided, anything for science.  I tried it, and low and behold, this was it. The flavor of the potatoes was incredible, delicious, and perfect. I’d finally matched, or more likely beaten, Babes at their own game.

So, that's how this recipe came about.  I've been making it for over ten years now for my family and friends, and it's always a hit.  Speaking of hits, when I posted this recipe, and mentioned Babe's in the text, the recipe itself started getting a lot of hits--thousands in fact.  Apparently a lot of people are looking for Babe's Mashed Potatoes Recipe.  Well, a couple things have happened over the years.  From readers here on the blog and other sources, I've learned with all likelihood what Babe's is in fact using, and it's different from what I do.  I also have decided that I like my recipe better than babes.  So, if you're trying to match Babe's exactly, I'll go over what I infer they are doing, but I urge you to try the recipe I devised, mayo and all, and see if you don't like it better.


Mashed Potatoes


4 large russet potatoes, peeled and cut in half (or enough to make about 5 lbs total potatoes)
1 stick (4 oz) salted butter
3/4 cup buttermilk
1 teaspoon salt - or more to taste
1/2 teaspoon white pepper
1/4 cup mayonnaise (or more to taste)


Wash then peel your potatoes.


Cut off any dark spots. Cut potatoes in half.  Fill a large pot with water, salt it slightly, then heat. When the water is boiling, add the potatoes.

Meanwhile, melt the stick of butter in a small saucepan and then add the buttermilk to it. Keep this mixture warm, but not boiling.

Cook the potatoes until they are soft, but not falling apart—Probably about 30-35 minutes. Now it’s time to use a little device known as the potato ricer.

I discovered this little device while researching mashed potatoes in one of my cookbooks (The Dean and Deluca Cookbook, in case you’re wondering). I’ve now decided it is absolutely essential for making perfect mashed potatoes every time. It worked sort of like a big garlic press. You put a potato half into it, squeeze, and perfect little flaky potatoes come out. There’s no lumps like you get with a potato masher, but also your potatoes don’t turn into a sticky, “book paste” like mess either, which can happen with both the masher, or if you use an electric mixer. No, the ricer produces little flakes that are the perfect texture. You can pick one up for about $20 bucks at a gourmet store. It’s well worth the expense.

So, rice the potatoes into a bowl (or mash them with something else if you don’t have a ricer, but don’t blame me if they are lumpy and/or sticky). Then grab a whisk and stir in your butter/buttermilk mixture.

Edit--Instead of pouring the butter mixture in like I'm doing here, ladle it in a bit at a time while stirring the potatoes, until they are the proper consistency.  Point being that you might not use all of the butter/milk mixture.  I've had some people tell me that they tried this recipe and the potatoes came out thin and runny, so I have added this technique, as such can happen if you've used smaller potatoes or lost some of the potato mass during the boil.

Don’t stir too aggressively; you want to keep the potatoes light and fluffy. Next, stir in your salt and white pepper.

Edit -- I used to call for two tablespoons of salt in this recipe, but over time I've just decided this is too salty.  I've backed it off to 1-2 teaspoons, and then I urge you to taste and adjust to your liking.  Babes potatoes are quite salty, but I find I like mine a bit less these days.

And finally, we come to the secret ingredient—Mayonnaise. Yes, it sounds weird, but this is definitely what will make your potatoes sing. I can’t say for certain if this is what Babe’s uses (Edit--it's likely not what they are using), but the taste of the potatoes comes out actually better.

Anyway, whisk in the mayonnaise, and your potatoes are done. Make sure you use real mayo here, and not Miracle Whip, as they are not the same thing. The mayo will actually react with the potatoes and turn them from a dull yellow color to a beautiful, bright white.

At this point, taste the potatoes. Adjust salt and white pepper as necessary.


So, there you have it, hopefully the best potatoes you’ve ever tasted, revealed right before your eyes.


Until next time,

Stay Starchy,


Chris


Edit:  So, the recipe above is what I consider the best Mashed Potatoes I've tasted, and I think they are better than what I get at Babes.  But in posting this recipe, I've had several readers tell me what they discovered Babe's is using.   I can't confirm this for myself, but it seems likely.

One of the biggest differences is they are supposedly using potato flakes instead of whole potatoes.  This makes sense, as it would be a nightmare for a restaurant to have to peel and cook enough whole potatoes for the volume of mashed potatoes a place like Babe's serves.  But if you're thinking of using potato flakes, I would urge against it.  They are notorious for producing some rather sticky, pasty potatoes.  Yes, Babes seems to be pulling off some good potatoes using them, so it can be done, but I still think whole potatoes, boiled and riced with a potato ricer, are superior.  In the near future I will endeavor to make several batches of taters with flakes and see if I can figure out a technique to make these work well enough.

The other difference is they are using sour cream instead of Mayo, as evidenced by the large Daisy Sour Cream containers that have shown up at Babe's catered events.  I have made this recipe using Sour Cream, and it is quite good, but I still find I like the mayo version better.  Both add a tangy quality to the potatoes, which is what sets both this recipe and Babe's apart, but the mayo seems to just do something else that adds to the flavor.  If you want, try it both ways, using sour cream once, then mayo another time, and see which you like better.

Friday, July 22, 2011

Smoked Beef Brisket - A Treatise


Ingredients:

1 Full Brisket, 14 lbs or more
1 jar Gold Buckle Brisket Marinade
1/2 Cup Paprika
1/2 Cup Granulated Garlic
1/3 Cup Chili Powder
1/2 Cup Cheap Yellow Mustard (Optional)


Barbeque means different things to different people around the country. In Memphis, Tennessee, it’s dry rubbed pork ribs; in the Carolinas, its pulled pork. Kansas City purports to do a hodge-podge of styles. But in Texas, beef is king, and nothing says Texas barbeque like smoked brisket.


When I was growing up, my family owned some land in east Texas. It was ten acres of mostly pine-covered woods with a ramshackle little collection of buildings at one end. We called it simply ‘The Place.’ All of the buildings were built circa the late 1800s, with the most useful being perhaps an old wooden smokehouse with a stone smoking hearth inside.

               My sisters, in front of the well, in front of the smokehouse, 1960s

I remember many fond days by my father’s side at the Place, a Dr Pepper in my hand, a beer in his, as we fired up that smoker and he slow cooked various delectable cuts of meat, including brisket. The scent of burning hickory still brings me back to those wonderful days, and the wonderful taste of that brisket.

My dad departed this world before I had the chance to learn all of his secrets for smoking brisket, so I have had to rediscover most of them on my own. But it is not a task I have taken lightly. Perhaps more than any other dish here on An Eatin’ Man, brisket is the one that I have most labored over. When done right, it is succulent, juicy and the most out of this world cut of meat you have ever tasted, but when done wrong it is average at best, inedible at worst.

I’ll say one more thing before I move on to my brisket methods. If you have only ever had brisket from a commercial or chain barbecue restaurant, then you haven’t really had brisket. It’s just not commercially viable to cook brisket properly in a restaurant environment and make a profit. Mom and Pop, or ‘hole in the wall’ places do a better job, but they still can’t compete with the backyard chefs and competition cooks that really know what they are doing. Smoking a brisket is an art, and like any art, it takes patience and time to do right.


First, lets talk about the brisket itself. It’s good to know what you are dealing with, if you are going to master this cut of meat. The brisket comes from the chest of a cow, and it made up of two muscles, the superficial and deep pectorals. When you receive a full brisket from your butcher, you will see that one end is flat and squared off, while the other end is somewhat fat and rounded. The flat end is called, coincidentally enough, the ‘flat,’ while the fat, rounded end, which is a separate muscle, is called the ‘point.’ (it’s also sometimes referred to as the ‘deckle’ end). Note: Sometimes you will find just the flat portion in grocery stores sold as ‘brisket.’ For the process I’m going to describe, I recommend against cooking just the flat. You need the extra fat that the point end provides to keep the brisket moist during the long, slow cooking process that we’ll soon cover.


So, why the long, slow cooking process? It is because brisket is, in its uncooked state, inherently tough. This muscle does a lot of work supporting the cow when it's just standing around in the field all day, so it has a lot of fibrous, connective tissue running through the meat. If you were to cook the brisket like a steak, you would end up with a tough piece of shoe leather on your hands. Slow cooking at very low temperatures breaks down that tough connective tissue, which is called collagen, literally turning it into a very flavorful liquid that makes your brisket moist, juicy and delicious. (Collagen isn’t fat, it’s a protein).

Over the years, and in various regions of the world. there have been different ways of dealing with this tough cut of meat. One method is simply grinding it up to make hamburger or sausage. In Jewish cuisine it has been braised slowly with water to make a pot roast like dish. Brisket can also be pickled in a salty/brine solution to make corn beef, and this can in turn be spice rubbed and smoked to make pastrami. Then there is the method for which we are gathered here today, the method that developed over the last hundred and fifty years here in Texas: Slow smoking in a barbecue pit.


Now before I begin outlining my personal methods to achieve what I consider brisket perfection, I must state that some of the things I will suggest are considered controversial among some pit masters and competition cooks. Why, do you ask? Well, basically, there is a mystique to smoking brisket, and a competitive spirit, and many believe that the best brisket is achieved with nothing more than the subtle dance of meat and smoke in the barbecue pit, and anything else you add or do to the cooking process is somehow ‘cheating.’ I admire these stalwarts, and I will admit I’ve tasted some very good brisket cooked unadorned in this method, but I’ve also tasted some dried out, over-smoked shoe leather produced from such a method as well, and with the price of brisket these days, it’s not worth the risk. I say, cheat away, because all that matters in the end is how good your brisket tastes, and none of your dinner guests are going to care whether you used foil or not, or which spices or marinade you used, unless, that is, they want to get your recipe.

So what follows is my recipe, which I’ve developed over the years, for what I consider the best damned brisket I’ve ever tasted. It’s a multi day process, so make sure you plan ahead. But each step is simple, and not that time consuming. Brisket is a lot about patience, and waiting. Luckily, mankind invented beer to help alleviate the waiting time. Drinking a beer or two during your brisket prep is definitely a must.

So to begin, get your hands on your brisket, or briskets. If you have a large enough smoker, then you can smoke several at one time, which is nice if you’re having a party. Brisket is the ultimate party food. I’ve done up to three briskets at a time in my Bradley smoker, but for the purposes of this demonstration, I’ll do just one brisket, and I’ll use a Webber charcoal grill to do my smoking, just to show you that you don’t need a fancy, big-assed smoker to do brisket properly. As long as you keep the temperature low and slow, you’ll be all right.


First, select your brisket. Grocery stores often put briskets on sale around Memorial Day, the Fourth of July, and Labor day. I usually buy several at these times and keep them on hand in my chest freezer. When you buy a brisket, select one that is at least 14-15 pounds, or larger, and make sure it still has the fat cap on one side. This is important to the cooking process.

Cut the brisket out of its plastic wrapping and place it, fat side down, in a foil pan. Here comes controversial step one. I use a store-bought marinade on my brisket, and I don’t just pour it on the brisket, I use a meat injector, to get the marinade deep into the brisket.


The marinade I use is made by Allegro, and called ‘Gold Buckle.’ It is top notch and has a wonderful flavor.


Note:  The above is an old pic--the bottle now looks like this:


They added Fajita to the name, but it's still the same stuff.

I have tried just about every other marinade on the market, and made some homemade ones, and nothing beats this one. Its only available seasonally in the grocery store, so I buy up all I can in the spring and summer months, so I’ll have some for fall and winter. If you don’t live in an area where it’s sold, you can mail order it from the Allegro website.


So, I inject about two thirds of the marinade into the brisket, then pour the rest over it.

At this point I used to go straight to my spice rub addition, but I've started a new step recently, so I thought I'd add it here.  I'm now adding a thin brushing of what we in the trade call C.Y.M., or Cheap Yeller Mustard.


Yep, just that plain old stuff in the yellow plastic bottle.  I started doing this to my pork butts a while back and I really liked the way it increased the tangy flavor in the bark.  So now I'm doing it to my brisket as well.  It adds flavor (not a mustard flavor, as you'd expect, but just a hint of tangy in the finished brisket) and it also helps the spice rub stick.


I then add the spice rub to the surface of the meat which consists of paprika, granulated garlic, and chili powder.


I sprinkle it on the meat, but I don’t actually rub it in.


The fully-spiced brisket:


Once this is done, its time to let the meat sit for 12 to 24 hours. If I plan to serve the brisket on a Saturday, then I will do this step on a Thursday afternoon. (Or sometimes Wednesday...more on this later) I then cover the brisket pan with plastic wrap, and then with foil, and put it away in the fridge to marinate.

The next day, I fire up the smoker around 11 a.m. In this case I’m using a standard Webber kettle grill, but I’m keeping the temperature low by closing the bottom vents almost all the way. First, I start enough charcoal to fill one of the indirect cooking trays about two-thirds full. Then I get my wood--


--I prefer Hickory, but pecan and oak are also nice, and any of the fruit hardwoods will work.  I then place about four chunks of the hickory wood that I’ve had soaking in water for several hours on top of the coals, and they begin to smoke right away. Edit:  I don't soak my wood anymore.  It does nothing.  Wood doesn't really absorb water that much--that's why the build boats out of it as they say--so now I just throw dry chunks right on the charcoal and close the smoker.  The wood smolders and generates smoke just fine, no differently than if I'd soaked it.  What keeps it smoldering and not flaring up is the fact that we are regulating a low amount of oxygen to the fire via the vents.  

About the only wood I wouldn't use (at the risk of offending some of my fellow Texans) us mesquite wood,  I find mesquite quite a bit too acrid for my tastes, so I use the the hickory.  But mesquite is quite popular in parts of Texas, particularly the western half.  In the east, I'd say hickory is king.


I now place the brisket, fat side up, fat side down, on the rack, (see note 1 at the end of this post for my views on fat side up versus down) offset from the coals so that it does not sit right above them, and place the cover on the grill. I turn the cover so that the smoke vent is opposite the side with the coals, and just over the brisket, so the smoke will flow over the brisket. I leave the top vent open wide, so the smoke keeps flowing, but I close the bottom vent so that it is only about one quarter open. This keeps the heat on my grill at just around 200 degrees, which is just about where you want it.

A little lower is okay, but not any hotter. I have known people that will tell you that you can cook brisket a little faster by going to 250, or even 300 degrees or higher. Well, they’re wrong. Brisket needs to be cooked low and slow for a looooong time.

Here the brisket has smoked for around two hours.  This is a good time to add more charcoal and wood.  I'll do it again after five to six hours.  (See Note 2 at the end of this post for my revised views on smoking times)  Avoid the temptation to take the cover off of your grill to look at the brisket.  (lookin' ain't cookin')  This will drop your temperature and release valuable smoke that otherwise would go toward cooking and flavoring your brisket.  Do it only when you need to add charcoal and wood. 
After four hours, your brisket will have absorbed all the smoke it needs, and should be about 130F internal temperature. This is when I do controversial step number two. I either wrap the brisket in foil (known in BBQ circles as the ‘Texas crutch’) and continue cooking it in the smoker, or better still, I put it back in the foil pan (fat side up this time), cover it with foil, and move it to my oven. I set the oven at 170 degrees, and then, depending on the size of the brisket, I let it cook for another 12 to 18 hours, low and slow.

Wow, that’s a long time, you say. You’re right, it is. But this is what it takes to fully convert the collagen in both the flat and the point. The good thing is, since the brisket is sitting in a pan of its own juice, it won’t dry out, and keeping it at 170 is a perfect ‘holding’ temperature once the brisket is done. If you use a meat thermometer, you will find that your brisket actually rises to 200 degrees at this temperature, and it stays there. This is because an oven set to 170 doesn’t actually hold that temperature perfectly. It heats up to around 200, then drops to 150, and then repeats. This is just the way ovens work.

Here is the brisket after four hours of smoking.  At this point, it has had plenty of smoke, but still has lots more cooking to be done.  I put it in the pan, (fat side up this time--this is very important) so that as it releases it juice, the juice won't be lost, but instead the meat will steep in it.  I then cover the pan with foil, and cook in a 170 degree oven for 12-18 more hours, depending on the size of the brisket.  If your not sure how long to go, just aim for 18 hours and you'll be fine.  At these low temperatures, your brisket won't overcook, it will just get done, and then basically hold indefinitely.  As I mentioned before, you could wrap the brisket in foil and leave it on the smoker, but this would necessitate tending the fire all night.  The oven is easier, you can put the brisket in in the evening, and let it go all night while you sleep. 

Note how much juice is released in a large, 16 pound brisket:


Be careful taking that foil pan out of the oven, particularly if there's a lot of juice.  To be on the safe side, you might want to kill the oven and let the brisket cool for 30 minutes to an hour before you move it.  The liquid will be close to 200F when your done, hot enough to scald, and those foil pans are a bit flimsy.

Anyway, when your brisket is done, you can serve immediately, or you can refrigerate and reheat it the next day. I’ve actually had people tell me brisket tastes better after it has been refrigerated for a day. My own personal jury is still out on this, but it definitely never tastes worse doing it this way, so if you’re having a big party, and have other things to cook, this is a great method. You just reheat it for 30 minutes or so at around 180F, then serve.

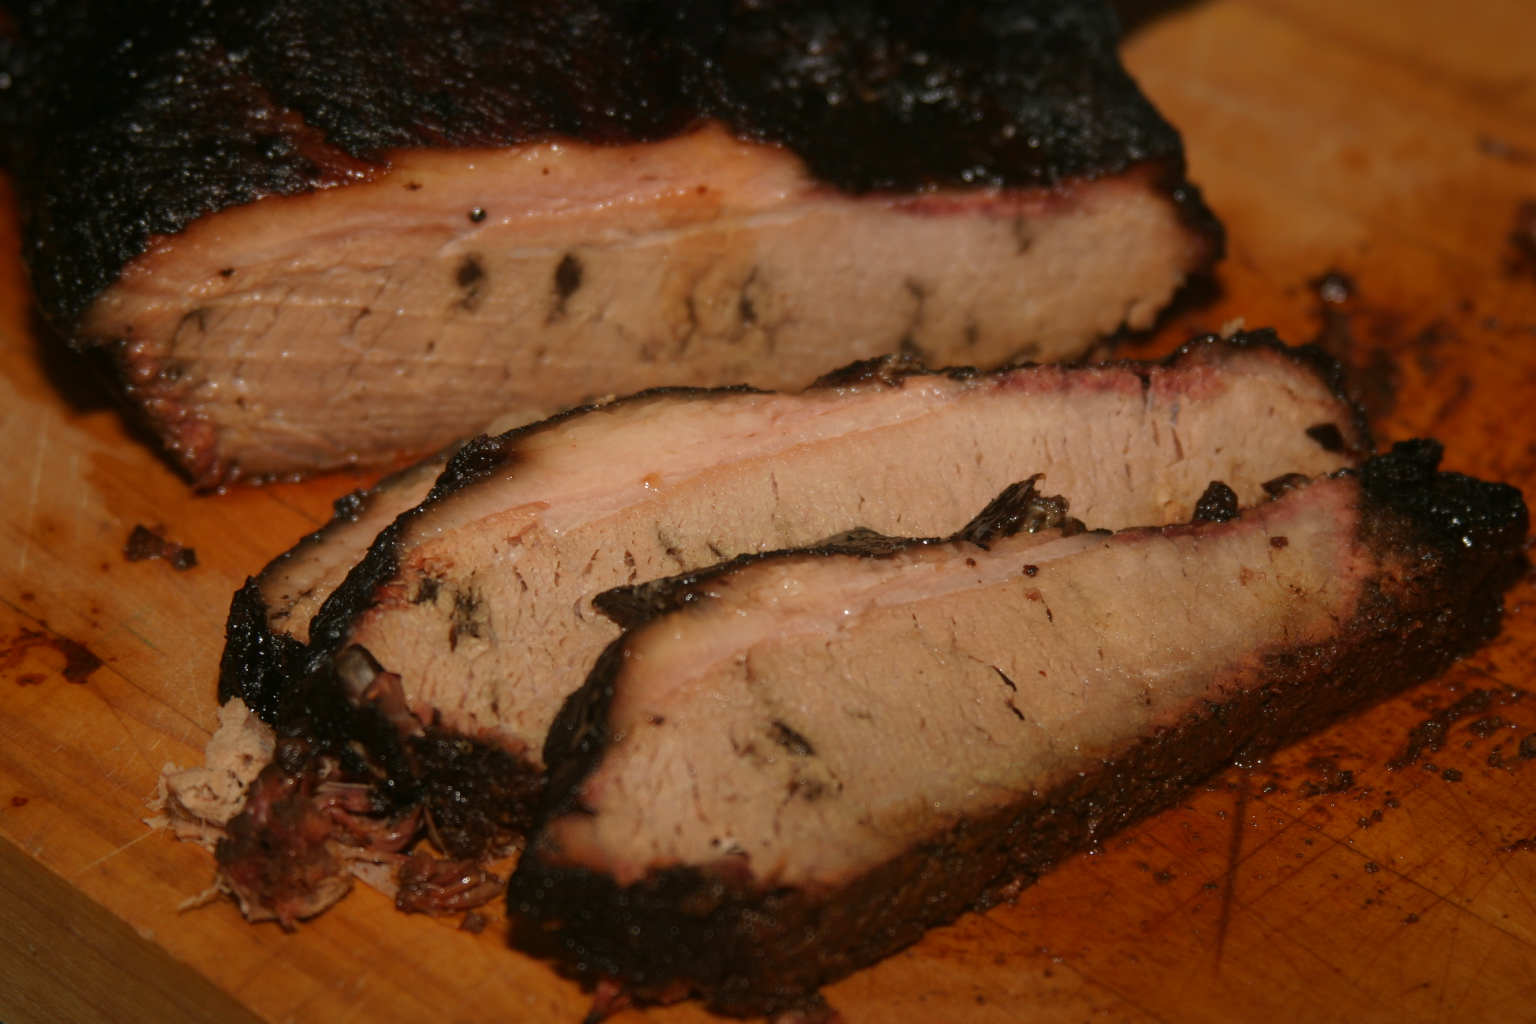
Slice 'er open and look at the juicy, succulent meat inside.  The dark spots are where the marinade has permeated the meat. 
So, how to serve this wonderful brisket that you’ve smoked? Well, the traditional method is to slice the flat, and chop the point. This is what BBQ places do, and its why there are always two kinds of brisket. The flat just slices up nicely, while the point, which even after 18 hours of cooking will still have a lot of fat, is more conducive to chopping up and serving.

Slice the flat against the grain to make slices perfect for serving. 

Another method that I like to do is to serve brisket tacos. To do this I have some soft corn tortillas on hand, and I pull the brisket, instead of slicing or chopping. To pull the brisket, slice the flat into one to one and a half inch sections, then pull them apart. The point will be a little more difficult, as it has this gelatinous sponge of fat spread through it. I usually just cut it against the grain into chunks, then grasp it by the burnt ends and pull the meat out–you’ll find it will slip right out of the fat.

Pulling the point.  Yes, there is a lot of fat still to work through, but the effort is worth it.  The point has some of the most tasty meat of the whole brisket. 
I then mix the point meat together with the flat meat and serve in the tortillas with some cheese and grilled onions.

So, that’s my method, and while not without controversy, I’ve used it over the years to produce pretty consistent results.


Anyway, I hope you’ll give this brisket recipe a try, and let me know what you think.

Until next time,

Smoke 'em if you got 'em,


Chris


*Note 1:  Fat side up or fat side down.  This is one of the many controversies in brisket circles.  When I started smoking briskets, I was told that fat side up was the way to go, because as the brisket cooked, the fat slowly melted and soaked down into the meat, keeping it moist.  Now, after learning a bit more about the physiology of brisket meat, I don’t think this is the case. One, you’ll notice that after thoroughly cooking your brisket, most of the fat cap is still intact, so it’s not really going anywhere, into the meat or otherwise.  Two, I now believe that most of the juicy moistness of a brisket comes from the collagen breaking down, not from melted fat wicking into the brisket. 

I’ve recently switched to fat side down.  I now believe this is better for two reasons.  One, the fat layer keeps some of the collagen, as it melts, from dripping out of the brisket.  Two, it provides a protective layer between the brisket meat and the fire, preventing the precious meat from scorching if the fire flares up.  I’ve now cooked several briskets fat side down, and they’ve come out great. 

*Note 2:  Duration of smoking.  With my hybrid method of smoker/oven brisket cooking, or unwrapped/foil wrapped (if you go that way), it is critical to get the brisket wrapped or placed in a pan and in the oven before it reaches 160 degrees Fahrenheit.  This is because 160F is that magic temperature that the collagen starts to break down.  If you take your brisket to 180F or higher while it is naked in the smoker, you run the risk of having some or all of the meat, particularly the flat, drying out on you.  I recently made a brisket that I smoked during the heat of summer, and it was a windy day, and this caused my smoker temperature to rise up into the 250-300 range.  The result, my brisket rose in temperature and completely juiced out before I got it in a pan and in the oven.  The result was edible, but just barely.  It was dry and quite lacking in flavor.  (I was glad I hadn’t made this one for a party, as I’ve garnered something of a good ‘brisket’ reputation over the years, and this one would have done me in)

So, with this in mind, I’ve revised my smoking times a bit.  After several experiments, I now believe that four hours is all the time the brisket needs in the smoke.  Smoke, I’ve learned, and thus smoke flavor, doesn’t really penetrate deeply into the meat.  Some people see the lovely pink smoke ring that forms around the edge of the meat and believe this is evidence of the smoke penetrating at least that far into the meat.  But the smoke ring, while desirable, is actually a chemical reaction that occurs during the smoking process.  According to author Derrick Riches, “The smoke ring is caused by nitric acid building up in the surface of meat, absorbed from the surface. This nitric acid is formed when nitrogen dioxide from wood combustion in smoke mixes with water in the meat. Basically it is a chemical reaction between the smoke and the meat.” 

So, the wonderful flavor of smoke on your brisket is just that, it resides on the surface of the meat, and after about four hours, you’ve got plenty of smoke flavor.  Keep in mind that it is possible to over smoke a brisket, however, particularly if you are using a strong wood like mesquite.  I’ve tasted some briskets that have stayed in the smoke for twelve hours or more, and they tasted like charcoal. 

So, if you’ve used my methods before, let it be known that I am now a fat side down guy, and I only go four hours or so in a 200F smoker, then I wrap the brisket in foil or transfer it to a pan and the oven.  With this shortened smoker time, the brisket usually only gets up to about 130F internal temperature while in the smoker, so all of the collagen is still intact, to be broken down into moist, juicy flavor goodness in the oven.


Quick Summary of An Eat'n Man's Brisket Process


Ingredients:

1 Full Brisket, 14 lbs or more
1 jar Gold Buckle Brisket Marinade
1/2 Cup Paprika
1/2 Cup Granulated Garlic
1/3 Cup Chili Powder
1/2 Cup Mustard (optional)

1. Remove Brisket from Plastic Wrap, place fat side down in tray
2. Inject Gold Buckle Marinade throughout Brisket with Meat Injector
3a. Optional--rub brisket with mustard (note this is a new step that I added recently, gives bark a tangier taste)
3b. Coat Brisket with Paprika, Granulated Garlic and Chili Powder
4. Let sit covered in Fridge for 12-24 hours
5. Smoke fat side down for 4 hours at 200˚F.
6. Place Brisket in Foil Tray, fat side up this time, and cover tray with foil
7. Roast in oven at 170˚F for 12 to 18 hours (longer for bigger briskets)
8. At this point, Brisket is done, and can be served immediately, or held in Fridge for a day
9. To serve, slice the flat against the grain and serve as Sliced Brisket
10. Chop the point coarsely to serve as Chopped Beef or, pull apart the whole thing for Brisket Tacos