Sunday, August 25, 2013

Cream of Asparagus Soup


I first tried this amazing soup at Paris’ famed restaurant La Tour D’Argent, and have loved it ever since.  Theirs was the most wonderful version I’ve tasted to date, so creamy and full of flavor.  Alas, the serving, as is the custom in such French restaurants that serve many many courses, was quite small, only a few sips really, then it was off to the next course. 


I’ve examined quite a few recipes over the years trying to replicate the taste of La Tour D’Argent’s version, but I’ve never quite pulled it off.  This version below is the closest I’ve managed to come.  It’s quite tasty. 

Cream of Asparagus Soup

2 Pounds Green Asparagus, Chopped, Tips Reserved. 
1 Medium Onion, Chopped
3 Tablespoons Butter
10 Cups Chicken Broth
2 Teaspoons Fresh Thyme
2 Teaspoons Dried Herbs De Provence
1 Teaspoon Granulated Garlic
Salt and White Pepper to taste
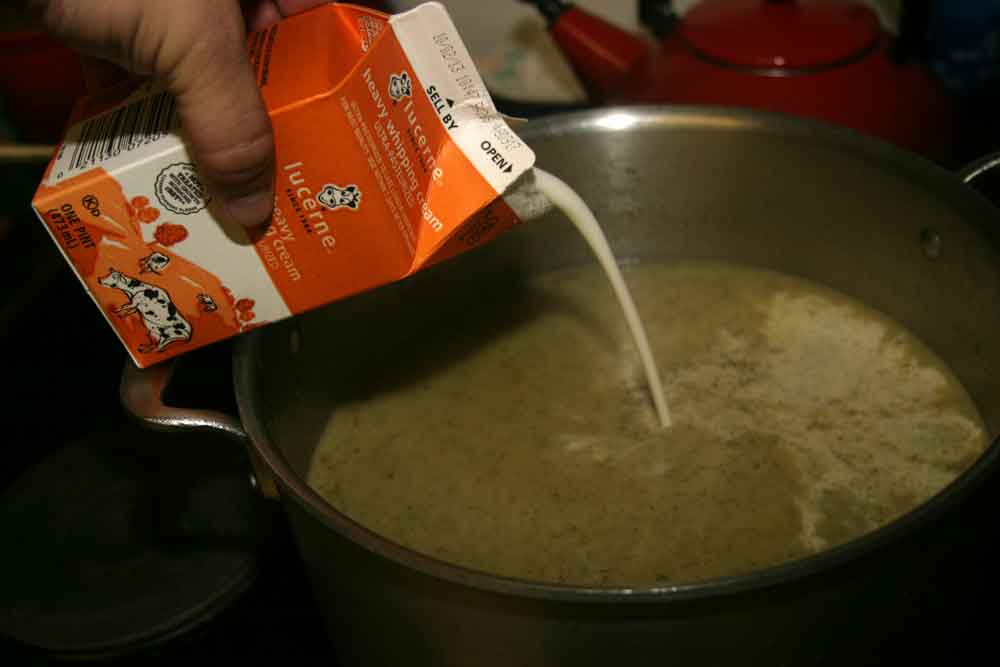
1 ½ Cups Heavy Cream
¼ Teaspoon Lemon Juice

Chop the onion 


and sauté in the butter until the onion is translucent but not brown.  While onions are cooking, chop the asparagus into inch long pieces, 


discarding the thick woody end pieces and reserving about half the tips for garnish.  When the onions are starting to clear, add the asparagus pieces and cook another five minutes. 


While the asparagus pieces are sautéing, add the Thyme, Herbs de Provence, and Garlic.  


After this has sautéd a minute or two, add the chicken broth.  


Bring to a boil, then reduce to a simmer and cook for 20 minutes or so, until the asparagus is tender.  Add salt and white pepper to taste at this point.  While soup is cooking, boil the reserved asparagus tips until they are soft and tender.  


Set aside. 

Next, use a stick blender if you have it to puree the soup, otherwise do it in batches in your blender.  


Add the heavy cream at this point and stir to combine.  


Add the lemon juice, taste and make any final adjustments.  Serve immediately, with a few of the reserved asparagus tips dropped in for garnish. 


Until Next Time, 

Bon Appetit!

Chris


Tuesday, August 20, 2013

Vichyssoise


I’ve decided August is soup month here on An Eatin’ Man, so I’m going to feature a couple of summer-wonderful soups for your cooking pleasure.  To start things off, here’s one of my favorite summer time soups, Vichyssoise. 

This French-sounding soup is in fact an American invention, first appearing on the menu of the Ritz-Carlton in the early Twentieth Century.  But it was inspired by the potato and leek soups that Chef Louis Diat enjoyed as a child in France, so there is some connection.  The addition of cream helps chill the soup after it is cooked, creating a refreshing cold soup for summer consumption. 


Vichyssoise

4 Tablespoons Butter
2 Cups Chopped/Diced Leeks, White and Pale Green Parts Only
1 Medium Onion, Chopped
2 Lbs Russet or Yukon Gold Potatoes, Peeled and Chopped
8-10 Cups Chicken Stock
2 Teaspoons Salt (or to taste)
2 Teaspoons Fine-Ground White Pepper
1 Cup Heavy Cream
1 Cup Sour Cream
Chopped Fresh Chives for Garnish

Wash your leeks thoroughly, then slice off and discard the end piece with the small roots.  Then slice and chop the white and pale green portions of the leeks (or leek, if you find one as big as I have here).  


Chop the onion as well.  Melt butter in a large pot and sauté the onion and leeks until they begin to turn translucent but do not brown them. 


Meanwhile, peel and chop your potatoes. 


Add the chicken stock 


and then the chopped potatoes.  Bring to a boil, then reduce to a simmer and cook for 30-40 minutes, or until the potatoes are cooked through and the leeks/onions are tender.  At this point, puree the soup in batches in a blender or food processor, or, if you have one, use one of these nifty stick blenders to puree the soup right in the pot. 


Once pureed, add salt and pepper and taste.  Adjust as necessary.  Next, stir in the heavy cream and sour cream.  


Taste and make any final adjustments as necessary. 

Now, at this point, you have a decision to make.  This soup is traditionally served cold, so you will need to chill it in the fridge or a water bath until it is cold and refreshing.  Or, you can be a freak like me and serve it hot, which is also quite delicious.  I usually serve it hot right after I’ve cooked it, then cold as a leftover the next night or two.  Best of both worlds, right?


Until next time,

Soup’s on!


Chris

Saturday, July 27, 2013

Slow-Smoked Baby Back Ribs


Here in Texas, beef brisket is the king of the barbecue pit, but you can’t go wrong with some tender, mouth-watering pork baby back ribs.  This is a great dish to add to your barbecue repertoire, and unlike brisket, which can take days to be ready (at least with my method), baby backs can be prepped and smoked in only about a half day. 

Baby back ribs come from the back section of the hog, as opposed to spare ribs, which come from the belly. Baby backs are smaller, but are generally meatier.  They don’t have as much fat as spare ribs do, but they are still contain a good bit of tough connective tissue, so they have to be smoke cooked at a low enough temperature so that the connective tissue breaks down.  But, you have to be very careful, because since baby backs don’t have a great deal of fat, they can dry out on you if you let them go too long in the smoker. 

I buy my rib racks in three packs at wholesale stores like Costco and, if I’m only smoking for the wife and I, the excess can be vacuum sealed and frozen.  If I’m smoking more than three racks, I’ll use the big smoker, but for just three, the Weber kettle grill makes a fine mini-smoker. 


Slow-Smoked Baby Back Ribs

3 Racks Baby Back Pork Ribs, about 1 Pound Each
¾ Cup Firmly Packed Brown Sugar
½ Cup Paprika
¼ Cup Turbinado Sugar
3 Tablespoons Black Pepper
3 Tablespoons Course Salt
2 Teaspoons Granulated Garlic
2 Teaspoons Onion Powder
½ Cup Kansas City Style Barbecue Sauce

Mix the dry ingredients together in a bowl.  


Rinse your rib racks and pat dry and place them in a foil pan or large tray.  


If the membrane on the back of the ribs hasn’t been removed, peel this away and discard.  This will allow more smoke flavor to penetrate the ribs.  Sprinkle the dry rub mixture into the rubs and then rub it in with your fingers until the ribs are completely covered.  


Refrigerate for an hour or two to let the rub work its magic. 

Prepare your grill.  Yes, I said grill, but we won’t be ‘grilling’ the ribs.  Grilling means cooking directly over high heat, which would of course turn your ribs into shoe leather.  We’ll be setting up the grill for indirect cooking, so that the heat source is to the side of the ribs, and not under them.  We’ll also be adjusting the dampers so that we are cooking at around 220 degrees Fahrenheit, and no hotter.  Any hotter and you risk getting your ribs done before the connective tissue has broken down, resulting in ribs that are tough and potentially dry as well. 


Start about 12-14 briquettes of charcoal and then place four small hickory (or other smoking wood) directly on top of the coals.  Place ribs on rack to the side of your coals...


...then close cover.  Leave the damper on top of the grill fully open, and adjust the bottom damper so that you achieve a temperature of around 200-220F.  Let the ribs smoke for one hour. 

At this time, add more charcoal or wood if necessary, and rotate the ribs so that a different rack is next to the fire.  (if you don’t rotate, the rack that stays closest to the fire can dry out).  Let them go for another hour.  Add fuel and rotate again.  After another hour (three hours total) the ribs should be close to done.  You can tell this by the fact that the meat has contracted a bit, leaving the ends of the bones poking out.  You can also press the rib meat with your finger.  It should yield quite easily. 

At this point, if you’re satisfied that your ribs are done, brush on a light coat of barbecue sauce and then let them go another fifteen minutes.  


At this point, they are ready to go.  Slice them with the bone into individual rib servings, taking care to leave an equal bit of meat on either side. 


Serve them with some more sauce and your favorite sides.  Here we’ve served them with some cowboy beans and homemade slaw.


Until next time,

Smoke ‘em if you got ‘em,


Chris.  

Homemade Barbecue Sauce


The aisles of your local grocery store are probably chock full of tens if not hundreds of different types of barbecue sauces.  So why make your own, right?  Well, a good reason might be that most of those industrially produced, preservative-laden sauces at the grocery store are about as flavorful as store-brand ketchup.  Sure, there are a few little locally-produced sauces that aren’t too bad, but the thing is, making your own sauce is fun, easy, and flavorful, much more so since your avoiding all those preservatives and artificial flavor enhancers, not to mention high fructose corn syrup.  Plus, barbecue is such a ‘pride’ dish that adding the additional element of your own sauce will only amp up your street cred on the BBQ circuit. 

This recipe produces a traditional Kansas City Style barbecue sauce, which is pretty much the generic standard these days.  But know this; there are as many different sauces as there are styles of barbecue.  The U.S. has, right off the top of my head, at least eight different regional styles of barbecue, (Texas, Kansas City, Memphis, East Carolina, West Carolina, South Carolina, Alabama, Santa Barbara), and there are probably more I’m forgetting right now.  Almost all of these have their own sauce, with the possible exception of Memphis style, which is generally a dry rub barbecue.  All the various sauces have their strengths, but for this article, will start with the one that is most widely known, KC style. 


Homemade Barbecue Sauce

2 Cups Ketchup
¼ Cup Cheap Yellow Mustard
¼ Cup Cider Vinegar
¼ Cup Worcestershire Sauce
¼ Cup Brown Sugar
2 Tablespoons Turbinado Sugar
2 Tablespoons Molasses
2 Tablespoons A1 or Similar Steak Sauce
2 Tablespoons Honey
1 Tablespoon Onion Powder
1 Tablespoon Paprika
1 Tablespoon Chili Powder
1 Tablespoon Hickory Smoked Salt
1 Tablespoon Lemon Juice
1 Tablespoon Tabasco Sauce (Optional)
½ Teaspoon Black Pepper

Mix your dry ingredients together until well combined.  


Note, one of the dry ingredients is hickory smoked salt.  I find this gives a nice hint of smokiness to the sauce without resorting to the controversial ingredient ‘Liquid Smoke,’ which to me has a somewhat medicinal and artificial taste, even though it is produced with natural smoke. 


Next, mix your wet ingredients in a separate bowl.  


Combine the wet and dry in a saucepan and heat over medium heat until the mixture begins to bubble.  


Stir frequently for about 5-10 minutes over medium heat, letting the flavors combine. 


Let cool and then bottle.  Use immediately, or refrigerate for up to two weeks.  


Until next time, 

Get Saucy!

Chris


Monday, June 17, 2013

Tomato Phyllo Tart


As many of you know, I love pizza in all its infinite varieties, and while this dish certainly looks like a pizza, and slices like a pizza, I’m going to claim that it is most definitely not a pizza, but a tart.  


I claim this because we’ve subtracted from the mix one of the defining things that makes a pizza a pizza: the bready crust. 

What we’ve replaced it with is that wondrous but finicky food item from Greece known as phyllo dough, a paper-thin pastry dough meant to be layered to make a number of tasty pastries and sweet treats.  Of course this tart is savory, so we’ll be skipping the sweet.  It is certainly pizza-like, but the overall dish has more of a Greek feeling and flavor than an Italian one, mainly because of the phyllo, but also due to the selection of toppings.

A word of warning:  Phyllo dough can be notoriously difficult to work with if you don’t prepare properly.  It usually comes frozen, so it first must be thawed properly.  The only way to do this right is several hours in the fridge.  If you just set the dough out on the counter, it will thaw too quickly and become mushy.  If you don’t thaw it long enough it will be too brittle to unroll.  Add to this the fact that even perfectly thawed dough will dry out quickly when you leave it on the counter, and phyllo dough can be daunting indeed. 

But, it is a very rewarding ingredient when used properly, so don’t be daunted, and give it a try.  Just thaw it several hours in the fridge, roll it out carefully, and keep it covered with plastic wrap or a damp towel when you’re doing other things and you should be fine. 


Tomato Phyllo Tart

12-14 Sheets Phyllo Dough, thawed
1/3 Cup Extra Virgin Olive Oil
1/3 Stick Butter
1/4 Cup Breadcrumbs
4 oz. Prepared Pesto
1 8 oz. Block Feta Cheese
2 oz. Crumbled Feta Cheese
2 Roma Tomatoes, Sliced into Thin Slices
Several Kumato or other Small Tomatoes
1/3 Cup Kalamata Olives
Fresh Basil

Preheat oven to 400°F.

After thawing your phyllo dough properly (see above) unroll it 


and place one sheet on a greased or parchment paper-lined baking sheet.  Melt the butter and blend with the olive oil.  Brush the phyllo sheet with the butter/olive oil mixture.   


Sprinkle this with a light sifting of breadcrumbs.  


Layer another phyllo sheet on top of this.  Brush this sheet with the pesto mixture.  


Continue layering the phyllo sheets one after the other, alternating the butter/oil/breadcrumbs with the pesto.  Continue until all the sheets are used.  Make sure you spread the last layer with a good helping of the pesto mixture. Fold the edges over to make a half-inch crust. 


Slice the block of feta into thin slices and layer them onto the tart.  


Next, layer on the Roma tomatoes, leaving some space between them.  


You will then fill this space with the smaller Kumato Tomatoes or whatever small tomato you are using. 


Next, spread your Kalamata olives liberally about the tart, then finally sprinkle on the feta cheese crumbles. 


Bake in the 400°F oven for 30-40 minutes, keeping an eye on it and taking the tart out when the phyllo crust turns a golden brown and is crispy. 


(The delicate layers of the phyllo dough make a delightful, light crust)

Allow to set for about five minutes, then slice and serve with some of the shredded fresh basil. 


Until next time,

Opa!

Chris