Showing posts with label roast. Show all posts

Thursday, March 31, 2016

Perfect Roast Beef


Tender, juicy, rare roast beef--is there anything better or more comforting on a cold winter's day?  I guess you could say I was raised on roast beef.  For pretty much my entire childhood and teen years, Mom made a roast every Sunday like clockwork.  It was good, hearty fare, but like most of the meats we ate back then, Mom made her roasts pretty close to well done.  I cringe a little bit at that now, but we didn't know any better then.

However, when we would go out to a little British themed place called the Piccadilly CafĂ©, the roast beef they carved up there was pink--maybe even red in the center.  They served it up dripping with natural gravy and--don't tell Mom--but I liked it better.  It was so much more flavorful, succulent and savory.  I'd had my first encounter with rare beef--what beef is supposed to taste like.

Years later, as an adult, I tried to replicate this rare beef, but at first I didn't have much success.  Sure, I used a meat thermometer, and cooked my roast to a rare temp, but it was only rare in the center, and pretty much well done the rest of the way through.  What I wanted was that nice, pink rareness throughout the roast.  To achieve this, I took a lesson from my brisket smoking technique and tried doing things low and slow--low temperature cooking for a longer time.

This proved to be the key.  Roasting it lower means the roast will cook much more even, and be rare almost to the edge.  Keeping the meat at this lower range of temperatures for a longer time also allows the meat's natural enzymes to break down things a bit, further tenderizing the roast.

So, let's get started.  First, select your meat.  I've found the traditional beef chuck cut to be a little too fatty for my tastes--I go for the round or rump cuts.  Beef round is composed of three different muscles, which--when cut into roasts are referred to as Top Round, Bottom Round and Eye of Round.  I've tried each of these, and all do nicely with this technique, with perhaps the eye being the best.  All three have a rich beef flavor and, while a little tough, they tenderize up nicely with this slow cooking technique.


Ingredients

4 lbs Round Roast (Top, Bottom or Eye of)
1 Teaspoon Salt
1/2 Teaspoon Pepper
3 Tablespoons Olive Oil
4 Carrots, Chopped
2 Potatoes, Cubed


Any of the Round Roasts work great.  Here I'm using Top Round.  


Preheat Oven to 225˚F

Heat Olive Oil in a skillet.  We're gonna first brown the outside of the roast.  This will develop some of the flavors we want in the roast.

Salt and Pepper the Roast

If it's got a fat layer on it, you can either remove it or keep it, cutting some slits into it to keep it from warping duing cooking.

Sear the roast in the olive oil on all sides.


Place on wire rack over roasting pan.  If you cut fat from the roast, don't discard it--place these pieces on the rack with the roast.


They will render additional drippings in which you can roast veggies.

Roast for an hour at 225˚F.  Then toss the  veggies in olive oil and place in pan under roast.


There should be some nice drippings in there now that will cook and flavor the veggies.

Roast until internal temperature of meat reaches 115F. About two hours total time.

Turn off oven and let roast continue to cook in cooling oven until internal temp reaches 125F

Slice the roast against the grain in thin slices


Note how there is pink almost to the edge of the roast--thanks to the low and slow cooking technique.
The veggies should look like this now:


If they don't--return them to the oven for a few minutes at 450˚F to brown them a bit while you carve your roast.

Serve with the veggies. And maybe some Yorkshire Puddings, if you like.


.


Until Next Time,

Eat ya some beef!

Chris


Saturday, November 7, 2015

Roasted Vegetables with Apple Cider Vinaigrette


November's at hand, which brings with it my absolute fav holiday--Thanksgiving.  Yes, I like Christmas, and New Years, and Saint Patrick's Day, and so on and so on...but I just love love love Thanksgiving.  It's one of the few holidays that hasn't really 'gone off on itself,' or gone commercial,  It's still a simple holiday that's all about family, food (and, for those of us in Dallas and Detroit, Football)


We're pretty trad, dad, here in the Eat'n Man's extended family fests, so Thanksgiving is all about turkey, dressing, mashed potatoes, cranberry sauce and the like.  But I think from time to time it's fun to inject a new or different dish or two into the line up, just for variety's sake.  Here's one we did this year, a nice spread of roasted veggies with a fab apple cider vinaigrette dressing.

Other than chopping up lots of veg, this dish is quite simple, and you can make it ahead of time (even a day or so) and chill in the fridge.


1 Pound Carrots
1 Pound Parsnips
1 Pound Red Beets, Peeled
10-12 Garlic Cloves
1 Cup Frozen Pearl Onions, Thawed
1 Pound Brussels Sprouts
Several Rosemary Sprigs
4 Tablespoons Olive Oil
Kosher Salt and Cracked Fresh Pepper to Taste
Apple Cider Vinaigrette Dressing (Recipe to Follow)
1 Head Radicchio
1 Head Savoy Cabbage

Preheat oven to 425˚F

Chop Your veggies.


Cut the carrots and parsnips into 3 inch long segments about a half inch or so in width.  Cut the beets into disks and then half these if they are large.  I left my Brussels sprouts whole here since they were small, but I think next time I'll halve them--they'll get more roasty and lose more of that, ahem, pungent aroma and flavor they are infamous for.

Place the veggies in a plastic bag.


You'll have quite a bit of veg, so you'll probably have to do this in batches.  Then add a tablespoon or so of olive oil, seal bag, then shake your moneymaker til the veggies are all well-coated with oil.  I make sure to do the red beets separate from the other veggies so they don't turn the others all reddish in color.

Spread your veg out on a couple of trays, leaving some room between the individual veggies to they roast evenly.  Season with salt and pepper, then go get your rosemary.


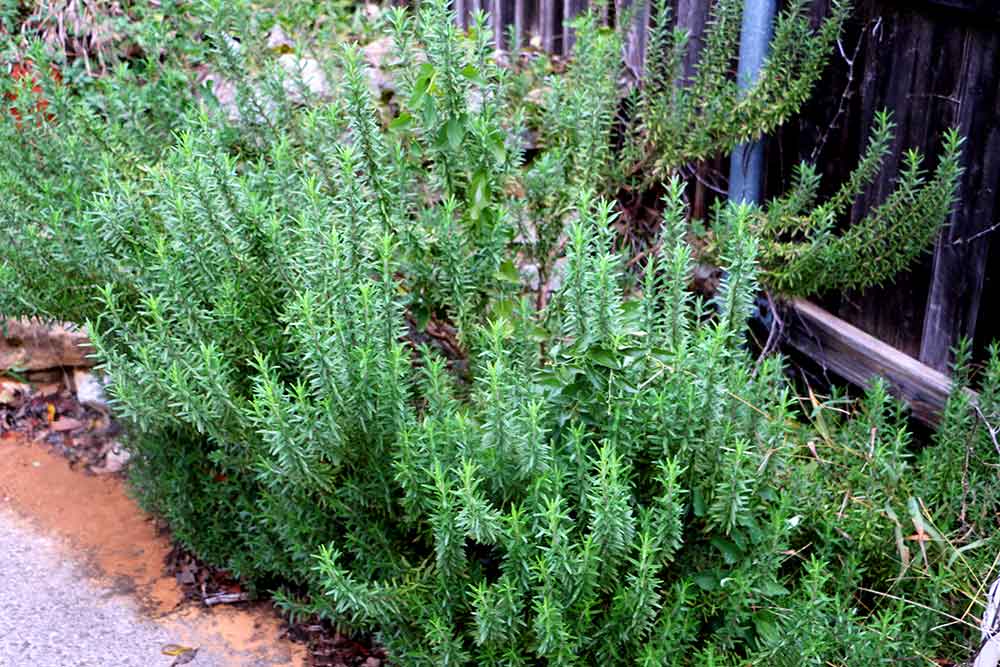
Here's the rosemary bush in our back yard.  It's absolutely out of control, but we never want for rosemary, that's for sure.


Cut some sprigs and then place three or so on the trays with the veg.


Toss half the garlic cloves on each tray, then roast at 425˚F for 20 minutes or so, then rotate the trays to opposite shelves in the oven and roast for another 20 minutes or so, until the veg are nice, soft and golden around the edges.


Let the veggies cool to room temperature and then toss with the apple cider vinaigrette dressing. Separate several leaves from the Radicchio and Cabbage, place them on a platter, alternating each type of leaf.  Place the veggies on the platter in a pleasing arrangement.


Serve with a little extra vinaigrette on the side.


Apple Cider Vinaigrette


3/4 cup extra virgin olive oil
1/4 cup apple cider
1/4 cup apple cider vinegar
2 tablespoons finely chopped shallot
1 tablespoon whole grain Dijon mustard
1 tablespoon honey
1  teaspoon kosher salt
1/2 teaspoon dried thyme
1/2 teaspoon freshly ground black pepper

Place all the ingredients in a carafe or large jar and shake well.  Place in fridge for an hour or so for flavors to meld.  Shake again just before serving.


Until next time,


Eat your veggies!


Chris


Thursday, February 19, 2015

Roast Leg of Lamb


Ingredients

1 Leg of Lamb
1/4 Cup Whole Grain Mustard
4 Cloves Garlic
2 Tablespoons Herbs de Province


Leg of Lamb.  This dish intimidates some cooks because its a relatively expensive cut of meat, and we just don't eat that much lamb here in the States.  But if you don't roast a leg now and then, you are denying yourself one of the world's great culinary traditions.  Lamb has a wonderfully succulent flavor and roasting a leg of lamb is simple and virtually foolproof, as long as you don't overcook it.  Yes, lamb, like a good steak, is better enjoyed on the rarer side of things.

You can usually get a nice 3-5 pound leg at even a common grocery store these days.


Just check the date--lamb can go horribly wrong if its past its date.  You can do bone in or boneless.  Bone in might give you a little more flavor, but its a bit more difficult to carve.  Today we'll be going with boneless.

Remove it from its plastic wrap, and if it is in a webbing, like here,


Remove the web and unroll the leg.


You can see where the bone ran quite easily.  We're going to spread some whole grain mustard inside the cavity where the bone was.


.


Then we'll roll it back up and tie it off with some butcher's twine.


This mustard will give a nice subtle tang to the flavor of the lamb, but otherwise it doesn't need much.  Lamb, even the leg, is inherently tender, and needs pretty much no marinade.

Once she's all tied up, pierce the outside all over with the sharp end of a knife to a depth of about a half inch.


Slice a couple of garlic cloves into thin strips.


Insert these strips in the incisions you've made in the lamb.


Next, brush with olive oil  (light or pure, no extra-virgin here, it has too low of a smoke point)


Then sprinkle some herbs de Province all over.


Heat your oven to 450F.  While it is heating, peel a potato, slice it in half, and then cut it into half-inch thick crescents.


Yes, we're gonna roast some taters in the pan drippings of the lamb.  They will make an outstanding side.

Place the potato slices in a plastic bag, pour in some olive oil, then a tablespoon or so herbs de Province, then shake well.


Toss the potato slices in the bottom of a roasting pan.


Place a rack over them, then place the leg of lamb on top of this.


Roast at 450 for 5 minutes, then reduce the oven to 325F and roast for around 15 minutes per pound, but to be safe use a meat thermometer and remove the lamb when it measures 125F in the center for rare, or 135F for medium.  I wouldn't go much over that, as a well-done leg will be dry and tough and will have lost much of its flavor.   Oh, and keep an eye on your taters.  If you're doing a 4 pound roast like I have here then the hour or so roasting time should be perfect for the thick potato slices.  If you've got a bigger leg, you might need to pull the taters when they turn golden brown


and continue to roast your lamb.

Wither way, pull the lamb out when it is done and let rest five minutes or so, letting the juices redistribute.

 .


When ready, carve it in nice thick slices.  It should have a nice healthy pink color in all but around the edges.


Plate and serve simply, as I've done here.


If you must, feel free to add a side of mint jelly, as that is the traditional accompaniment.  But, I really don't care for it...feel it covers up the lamb's naturally wonderful flavor.

Until next time,

Chris