Saturday, January 30, 2016

Wedge Salad with Buttermilk Blue Cheese Dressing


So then there's Iceberg Lettuce.  There was a time when it ruled the roost of the salad world, but with the introduction of all those fancy greens and boutique lettuces, it's safe to say the salad days are all but over for Iceberg.  People consider Iceberg bland and unexciting, and if you shred it up and toss it in the old salad, it pretty much is.  Flavor-wise, it's about as exciting as tap water.

However, what is lost on many people these days is that the beauty of Iceberg is not in its flavor, but in its texture.  Left whole, or at least in large pieces, Iceberg has a wonderful crunch that is simply delightful, and in this usage it provides an nice and neutral vehicle to deliver other flavors to your taste buds.

The pièce de résistance of Iceberg implementation is definitely the wedge salad.  This salad was a big deal back in the fancy restaurant days of the 40s and 50s, but somehow, it disappeared from menus for a few decades.  Thankfully, it's making a comeback, and I couldn't be happier.  It truly is wonderful, dripping with bacon and rich blue cheese dressing, and it finally lets the much maligned Iceberg come into its own.  Here's my version.

First, the dressing:


Buttermilk Blue Cheese Dressing

1 Small Shallot, Minced
1/2 Cup Buttermilk
1/2 Cup Mayonnaise
1/2 Cup Sour Cream
1 Tablespoon White Wine Vinegar
1/2 Teaspoon Worcestershire Sauce
1/2 Teaspoon Black Pepper
4 oz Standard Blue Cheese, Crumbled
4 oz Maytag Blue Cheese, Crumbled (or something even more bold, like Roquefort or Stilton

Note, we're using two different blue cheeses in this appellation--the milder of the two is blended in the dressing itself, the more bold is sprinkled on afterwards.


Dice your shallot and add it to a mixing bowl.  Add the Buttermilk, Mayo, Sour Cream, Vinegar, Worcestershire, and pepper.


Blend this with a whisk until smooth and well combined.


Crumble your blue cheese (the milder of the two) into small, coarse pieces.


Add this to the buttermilk mixture.


Whisk until just combined, then one minute more to dissolve some, but not all, of the blue cheese pieces.


Place in a jar and place this jar covered in the fridge for an hour or two to allow the flavors to meld.


Now, for the salad wedge:

1 Head Iceberg Lettuce
4 Strips of Bacon, Fried Crisp and Coarsely Crumbled
1-2 Teaspoons Fresh Chives, Minced
Several Plum or Cherry Tomatoes, Some Diced, Some Whole
Buttermilk Blue Cheese Dressing, as outlined above

The secret to making a good wedge salad starts with the cut.  If you're making four salads you might be tempted to slice the head half top to bottom, through the stalk.


Then you could slice this in half and have four wedges.  The problem with this cut is it is rather unattractive, and everybody gets part of the unappetizing stalk.

The solution, slice the head through it's equator, cutting off the top.


Then cut the top in half for two perfect wedges.


If you need more, just get more Iceberg heads.  The base can be discarded, or if you're really frugal, reserved for other uses like sandwiches or whatnot.

Now that you've got your prefect wedges, drizzle them liberally with the buttermilk dressing.  Sprinkle the crumbled bacon, chives and diced tomatoes on top of this.  Dress it with a few whole tomatoes and a side of extra dressing and you're done.


Serve with both a knife and a fork for this one.

Enjoy


Until next time,


May the Wedge be with you!


Saturday, January 9, 2016

Bean Pot Black-Eyed Peas


Black Eyed Peas.  These were a staple in my house growing up.  Mom used to buy them still in the pods and we would spend Sunday afternoons at the tedious task of shelling them.  I always loved them, but for some reason, we don't have them much anymore.  They'd sort of been relegated to New Year's Day fare, and that's a shame, because these babies are tasty and traditional, and a little change of pace as well.

Here's a relatively simple recipe that really brings out the flavor of these beans.  (yes, they are actually beans, not peas)  Black-Eyes have a unique, almost earthy flavor that is accented here with a little smoked ham and a few simple flavorings.

I'm also cooking them in my new bean pot, which my wife got me for Christmas this year.


I've been wanting one for a while.  It's a charming retro cooking vessel that you might say was the world's original crock pot.  It's shape is conducive to long, low and slow cooking.  I'll be featuring it in several more recipes that I've got cooked up for the future.  But first:


Bean Pot Black-Eyed Peas

1 Pound Dried Black-Eyed Peas
2 Tablespoons Olive Oil
6 Ounces Smoked Ham, Diced
1 Onion, Diced
4 Garlic Cloves, Minced
1 Teaspoons Salt
1 Teaspoon Cracked Black Pepper
1/4 to 1/2 Teaspoon Cayenne Pepper
1 Teaspoon Garlic Powder
1 Teaspoon Onion Powder
4 Cups Beef Stock
1 Can Consommé
1 Teaspoon Thyme

If you remember to do it, soak peas overnight until they have begun to get soft.   Or, if you're like me, and forget to do this the night before, but still want you're black-eyed peas for dinner, there is a 'quick method.'   Boil water in a medium sized pan.  Add peas,


let the boil recover and then boil for two minutes.  Remove from heat and let the peas soak for an hour.


Now they're ready to go.

Dice your onion,


And cube your smoked ham


And sauté them together in the oil.


Note, vegetable oil would be more traditional, but I generally use olive oil for just about everything savory that I cook, but use whichever you like.

After then onions and ham have simmered for 6-8 minutes, add the minced garlic.  Let this go for a minute or two, then add the salt, pepper, cayenne and garlic and onion powders.  Use just a hint of Cayenne if you're not into the heat.  That's what I do when I'm making these for the whole family.  But if it's just for me, I like to turn up the heat.


Also, you might wonder why we're using onion powder and garlic salt


when we've got fresh onion and garlic in the mix.  Well, I find each of these produce different flavor profiles in their fresh and dried forms, and sometimes I like to have both of those in the mix.  Rounds things out, so to speak.

Simmer this for a minute or so, then transfer it all to your bean pot.


Note, if you don't have a bean pot, a decent-sized Dutch oven will work fine.


Drain the black-eyed peas.


Discard the soaking water.  Add the peas to the pot.


Add the consommé.


Add the beef stock.


Finally add the thyme and stir everything up well.

Place in a 425˚F oven for 20 minutes.  After this, reduce the oven temp to 375˚F and cook for an hour and a half.

At this point, the peas should be cooked perfectly.


With a large spoon mash a little bit of the peas up against the side of the pot, then stir this in with the rest.  This will thicken things up and give the beans the proper consistency.

Serve them up hot, maybe with some hot sauce, or 'pepper sauce' if you want that Deep South authenticity.


Until next time,

Happy New Year,


Chris


Sunday, December 20, 2015

Holiday Roast Goose


Several years back the family and I did a themed Christmas--Dickens themed to be exact.  This mainly involved costumes, but some of it translated to the food as well.  We had (in addition to the Turkey) a standing rib roast and some sort of figgy pudding.  What we didn't have, though, was the quintessential centerpiece for any Victorian-themed table:  A Roast Goose.

Reason--Well, I couldn't find one, but I have to admit, back then, I didn't look that hard.  I was a little bit intimidated by roasting a goose for the first time, and perhaps a bit worried how the family would take to it.

Well, I was at the grocery the other day and I saw frozen geese for sale, and the wheels in my brain started turning.  Should I finally try this for Christmas?  Well, it was a few weeks before, so I decided this was the perfect time to to a test roast on a goose--see if I could pull it off and see how it tasted.

Here's the goose I found at the store:


I'd seen this brand once at Central Market selling for around $75 bucks for an eight to nine pound bird.  This one (same brand) was selling for $35 at my local groc, so I figured it was time to snatch one up.

Out of the plastic and thawed it looked like this.


Much longer and thinner than a fat American turkey.  Also, check out these wings:


Unlike the stubby wings of a common turkey, the goose is a true flier, so it's got some incredible wings.  They were so long, in fact, that I trimmed them up a bit (saving the cut pieces for stock)

Now, how to roast this sucker?   I've roasted quite a few turkeys over the last 20 years or so, and despite the fact that many people find such a thing intimidating, it couldn't be any easier.  Roasting a turkey is just a matter of time and temperature.  Roast it in the oven until it reaches the right temp--just don't overcook it.  Turkey comes out perfect with the breast 165˚F and the legs about 180˚F.

In researching goose roasting techniques, I found recommendations all across the board as to final temp.  Martha Stewart said to roast until the breast was 180˚F.  I cringed a little at this, as even I with my limited goose roasting knowledge knew that such would dry out that breast.

The FDA says to cook goose to 165˚F.  That's fine with nice white meat turkey, but with the dark red meat of goose?  Finally Hank Shaw, author of the cookbook Duck, Duck, Goose, recommended the rather unorthodox technique of cooking the breasts to 135˚F, then removing them, and then cooking the rest of the bird to 180˚F.  This sounded intriguing, as several other recipes said 135˚F was fine for the breast.  But, I really wanted a whole bird as the final product, as it makes such a purdy presentation.

I finally decided to roast to 150˚F in the breast, and see where I got with the thighs and other dark meat.

To prep, first I used a sharp boning knife to cut several slits in the skin of the breast, drum and thighs.


This bird is going to render a lot of fat, so you've got to give it a way to leak out.  By the by, just as with my entry on duck breast, don't throw out that fat, it is one of the most luxurious fats there is, great for roasting or flavoring other dishes.

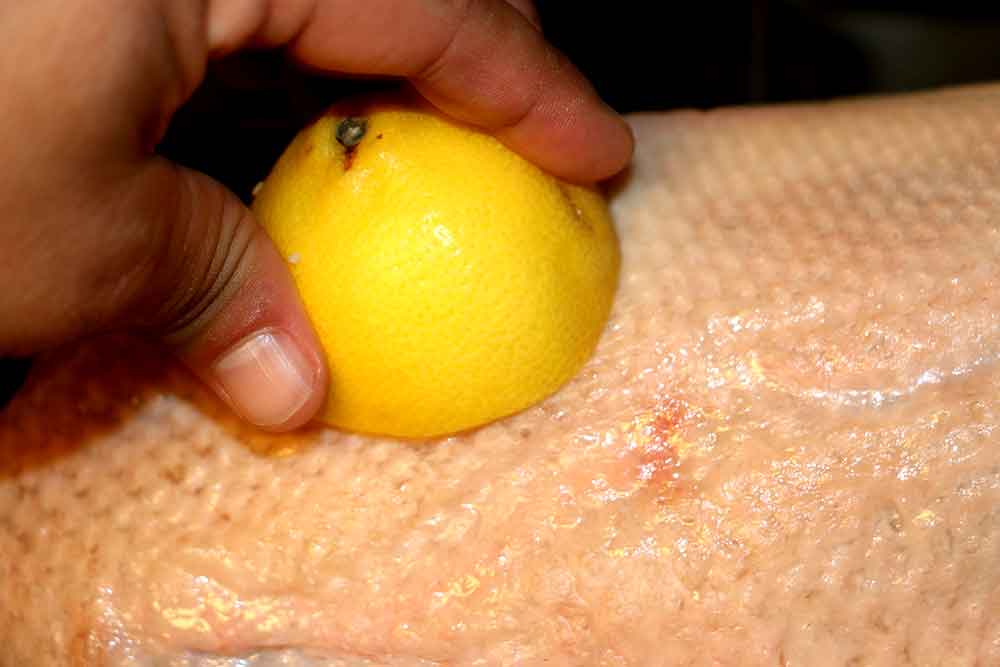
After this, I squeezed some lemon juice on the skin,


then rubbed it in with the lemon.


Then I deposited the squeezed lemons into the bird's cavity,


Along with some fresh rosemary from the garden.


Then it's into the oven at 325˚F.


Yes, this is a rather low temp, but as Hank Shaw suggests, the bird needs time to render that fat out.

I ended up roasting for about an hour and forty-five minutes to get to 150˚F in the breast.  The thigh at this point was about 165F, so it was acceptable.

Here's the final product.


Take a gander at that goose!

The breasts are a little thin for carving like a traditional turkey, so I removed them and sliced them crosswise instead, as you can see below.


Final verdict:  The bird was good, but the decision I made to get a 'whole bird' presentation compromised things a bit.  The breast was tasty, but a bit dry.  Next time I will try the 'remove the breasts at 135˚F' technique.  I think, like my duck recipe, they will be much better that way.  This is a red meat bird, like duck, and I think it is best on the rare side.  As for the thigh meat, it was still a little oily--it could have benefited from a longer cooking time.  Shaw says if you take the thighs to 180˚F, you'll get almost a confit-like, falling apart consistency, which is intriguing, as I like duck confit, so I may just do everything separate next time.

Anyway, it was a worthy experiment.  Oh, and that fat.  I roasted some potatoes in it.  Best I've ever tasted.

Until next time,


Hope you get a goose out of this recipe!


Chris


Sunday, December 6, 2015

Creamed Onion Tart


So holiday dinners at The Eat'n Man household have always been rather traditional--the family expects nothing less than the same culprits on the dinner table year after year--Turkey, Dressing, Mashed Potatoes, Sweet Potatoes, Green Bean Casserole, Cranberry Sauce, etc.  I will admit that, even though I am a daring trier of new and exotic foods, I find a certain level of comfort in the familiarity of the traditional dishes.  They sort of make the holidays, and we all look forward to them each year.

But, we do like to try new things, right?  Well, if your family gatherings are anything like mine, there are tons of people present, and this affords the opportunity to add something new and different in with the usual fare.  At least someone might like it.  With that in mind I started seeking out some different things to try as sides during the holidays, and this is the first one I found and tried--a creamed onion tart.  Yes, it sounds weird.   I have to say it is indeed different, but it came out great.  If you like savory dishes, you just might like this one.

For the Crust:

1 1/4 cups (5.25 oz) All-Purpose Flour
1/2 Teaspoon Salt
1 Stick Butter, Cut Into Eight Pieces
1/4 Cup Ice Water

Mix flour and salt in the bowl of a food processor.  Cut in the butter a piece in pulses until you have used it all.  Mixture should have a grainy consistency now.  With processor running, slowly add the ice water in drops until a dough ball forms.  Stop adding the water as soon as the ball forms...you may not use it all.

Wrap dough in plastic wrap and refrigerate for an hour or so.

For the Tart: 

4 thick bacon slices
1 tablespoon butter
2 pounds onions, thinly sliced
1/2 cup crème fraîche
1 tablespoon chopped fresh sage
1 tablespoon chopped fresh thyme
1 teaspoon kosher salt
3/4 teaspoon ground black pepper
1/4 teaspoon freshly grated nutmeg
3 large eggs, lightly beaten


Preheat Oven to 400˚F.  Fry bacon strips in a large skillet until crispy.  If you're like me, make a couple extra strips to eat--just 'cause.


While bacon is cooking, roll out your pie crust to about a 14 inch diameter round.  Transfer it to a greased tart pan, pressing to make sides thick.  Poke some holes in it with a fork (dock it, as they say in the baking world) then bake it for ten minutes and then set aside.


Note, in the picture above, I've used a pie chain to weigh down the crust and keep it from bubbling in the middle when it bakes empty.

When the bacon is done, remove from the skillet and reserve.  Melt the butter with the bacon grease and then sauté the onions


over medium low heat until they are translucent and caramelized a bit.


Beat your eggs and then whisk them together with the crème fraiche and the sage, thyme, salt, pepper and nutmeg.


Remove pie chain (if using) and transfer the onions to the tart crust.


Crumble the bacon strips and sprinkle this over the onions.


Ladle the egg/crème mixture over the onions.


Bake at 400˚F for 30 minutes or so until egg mixture sets and turns golden brown.  Let cool on a rack 10 minutes or so before serving.


Enjoy!


.


Until next time,

Happy Holidays!

Chris


10