Tuesday, November 23, 2010

Spiced Autumn Soup


I came across this recipe in an old cookbook, and was enchanted by the name. I love all things Autumn, from the blazing, colorful foliage to the early chill in the air; from the scent of chimneys firing up for the first time to the bountiful harvest of fruits and vegetables that are available fresh from the farmer’s market.


This soup makes good use of those fruits and veggies. We tried it a several years back, and have now made it just about every year to celebrate the season.


Spiced Autumn Soup

4 Tablespoons Butter
2 Large Onions, Coarsely Chopped
2 Potatoes, Coarsely Chopped
2 Carrots, Coarsely Chopped
3 Cloves Garlic, Crushed
Zest and Juice of 1 Orange
2 teaspoons mild Curry Powder
7 ½ Cups (1.8 liters) Chicken Stock
26 oz. Canned Chopped Tomatoes
2 Apples, Peeled and Chopped
1 Tablespoon dried Basil
Salt and Black Pepper

Melt the butter in a large saucepan, and add the onions, and cook for a few minutes, until they begin to turn clear. Add the potatoes, carrots, garlic and zest, and cook gently, stirring occasionally, for about 5-10 minutes.

Zesting an Orange:  If you're like me, and have been to too many Pampered Chef parties, you probably have this citrus zester:

It makes short work of zesting an orange peel:

If you don't have this fancy little gadget, you can just use a peeler and then dice the zest with a kitchen knife.  If you have a particularly large orange on your hands, you might only use half the zest...it is pretty pungent. 

Next, add the curry powder and cook, stirring, for 1-2 minutes more. Then add the stock, orange juice, tomatoes, apples, basil, and salt and pepper to taste. Bring to a boil, cover, and simmer for 30 minutes or until the vegetables are tender.

Puree the soup in a food processor or blender until smooth.


Return to the pan, reheat, and taste for seasoning.

Serve at once, preferably with some crusty, fresh baked bread or herb croutes.

(coming soon in a future blog post:  Rustic French bread!)

Hope you like the soup.  Until next time, Happy Autumning!


Chris


Wednesday, October 27, 2010

Coal Roasted Corn on the Cob


Just got back from a trip to Maryland, where our friends at Richardson Farms grow some of the best sweet corn I’ve ever tasted. And there's just about nothing I love more than corn fresh out of the field. 

(The Eat'n Man gets his corn fresh from the field)


(Fresh picked ears, ready to roast)

Fresh from the field is really best that way, because as soon as you pick an ear, the sugars begin to morph into starches, taking away the sweetness.  We brought a suitcase full home from Maryland with us, and after chowing down on several ears, I decided I would blog on my unorthodox method for roasting corn.

Of all the different ways to cook corn, I think coal roasting is the best, as it generates an amazing, sweet, earthy aroma as the corn roasts, and the flavor is out of this world, as some of the sugars in the corn will slightly caramelize from the intense heat. You can roast corn in your oven, or on a gas grill, but I find that nothing beats roasting it directly on top of hot, burning charcoal.

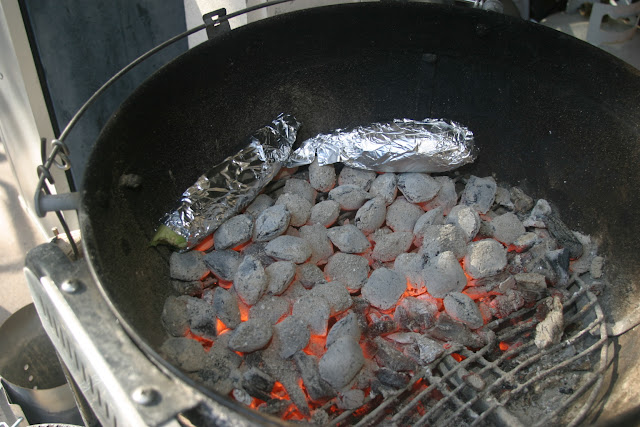
This is really one of the simplest methods of cooking anything, similar to hobo pack cooking, where you wrap food in foil and place it directly in the hot coals of the fire. First, simply take the corn, unhusked, and wrap each ear in a layer of foil. You might snip the tassel and long leaves off the top, but otherwise you don’t need to do much to it.

The foil will protect the husks from burning, and the corn will be steamed and roasted inside its own husk. There’s a lot of flavor and aroma in the husk, and particularly the corn silk, that will be released with this method--so don't be tempted to remove either before you wrap with the foil.

Place the corn directly on the hot coals. Let it sit about five minutes, then, using long tongs, give each ear about a third of a turn. Let that go another five minutes, and then one more third turn. Five minutes later, you’re done. Pull the corn from the fire and let it rest a few minutes, so the husk will cool.

When you remove the foil, you’ll see that the husks are slightly scorched, but the corn inside will be perfect.

With a little butter and salt, you’ll have a great side dish for a variety of entrees. Here we’ve served it with some sliced Flat Iron steak.

Until next time,

Stay Corny,

Chris

Tuesday, September 28, 2010

Green Chile Stew


One of my favorite parts of mid September is that it’s Hatch chile season. That’s when the tasty, spicy, pungent green chiles flow from Hatch, New Mexico to a market near you. They are to green chiles what Dom Perigon is to Champagne. They make the best green chile sauce, green chile enchiladas, or as we’ll see here today, green chile stew.

You can buy the Hatch Chiles already roasted and peeled at places like Central Market or Whole Foods, but it’s a lot cheaper to buy the fresh and roast them yourself, and it’s a lot of fun too. Plus, the aroma alone of the roasting peppers that floods your back yard is worth the effort.


Green Chile Stew

8 New Mexican Green Chiles, roasted, peeled, stems and seeds removed, chopped
2 pounds lean pork, cut in to one inch cubes
2 tablespoons vegetable oil
2 large onions, chopped
4 cloves garlic, chopped
1 large potato, peeled and chopped into ½ inch cubes
2 cans beef broth
3 cans chicken broth
1 can water
1 teaspoon cumin
½ teaspoon salt
½ teaspoon white pepper
2 tablespoons fresh cilantro, chopped
1 jalapeno, diced
Dash Mexican oregano

To roast the chiles:

Prepare a medium hot charcoal fire. Place the chiles on grate over fire, and allow the skin to blacken and blister.


Turn chiles so that all sides are exposed to the fire.  Remove from fire and place chiles in a freezer sized ziplock bag for 10-15 minutes.  This will allow them to sweat, and the skin will slip right off.
After 15 minutes in the bag, note how easily the skin peels off:

 Cut the stem end off the chile and squeeze out the seeds, then coarsely chop the chiles. 
Meanwhile, brown the pork in the oil, remove and drain.
Add the onion and garlic to the oil and saute until soft.


Next, place all the ingredients in a soup pot and simmer for two or more hours. Chop a little extra fresh cilantro to garnish the soup when you serve. Voila, Green Chile stew!

Note: In researching recipes for Green Chile Stew, I came across several that included tomatoes. I’ve tried it this way, and it does make a very flavorful stew, but I noted in my research that their use was controversial in some circles, and most New Mexican purists avoided tomatoes. Since I’m no stranger to ingredient controversies, i.e., beans/no beans in Texas chili (I’m firmly in the ‘no beans’ camp, but that’s for another article) I decided to leave out the tomatoes. Its keeps the stew greener anyway.


Viva los chiles,

Chris.

Friday, September 10, 2010

Flat Iron Steak


Yes, I’ll freely admit it, I’m a carnivore. I love love love me a good steak: Tender, juicy and rare. But when I’m not chowing down on tenderloins or rib-eyes, I like to try some of the other cuts out there. This is one that’s been an up and comer in the beef world in the past ten years – the Flat Iron steak.


This is one of the newer cuts of steak ‘discovered’ in the past couple of decades. It comes from the chuck, or beef shoulder, which as a whole is tough and fatty and not what you’d call prime beef. But hidden in the chuck is this one little sliver of a muscle that is as full of beef flavor as a round steak, but tender as a filet. Except for a few savvy meat cutters, this steak went unnoticed for centuries, which is why is it sometimes referred to as the ‘butcher’s steak.’


Nowadays, however, it’s been rescued from the hamburger grinder and is available at most grocery stores and meat markets, and while the price is going up as it gains fame, it’s still somewhat affordable compared to the prime cuts.

The Flat Iron steak works great on the grill, and is flavorful enough to need no adornment, but I usually marinate with a little Allegro just to indulge myself.


After that, grill it like any other tender cut of meat. A hot charcoal fire, as hot as you can get it...to sear the outside...

...and leave the inside juicy and pink.


Slicing it thin, against the grain, will enhance the tenderness, and make a nice presentation. 

Ah, it’s like heaven on a plate. Here served with some roasted corn on the cob.


Until next time,

Grill ‘em if you got ‘em.


Chris

Tuesday, August 31, 2010

Green Beans a la Bubba


O people of the blog-O-sphere, August was quite busy, and I find myself with only four measly blog entries for month. It’s the 31st, and I thought I better try to squeeze at least one more in before the calendar flips over to September. All this busy-ness brings to mind that sometimes is good to have a few simple side dishes in your culinary tool kit for those occasions when you’re pressed for time in the kitchen.


Here’s one I learned from my friend Bubba. It’s almost so simple you’d be hard pressed to call it cooking, as the main ingredient comes from a can. But I find it very tasty, and the ingredients can all be kept on hand in your pantry for months at a time. So when you’ve slaved away on a fancy Châteaubriand or some other culinary delicacy, and you need a little something to complement it on the side, you can pull this one out of your hat. You can even call it something fancier if you fancy that...Bubba won’t be offended.

Green Beans a’la Bubba


1 Can French or Italian Cut Green Beans
1 Packet Goya Ham Flavored Concentrate
2 tablespoons Diced Dried Onion


Open can of beans and do not drain. Add to a sauce pan over medium heat. Add the packet of ham flavoring and stir. Add the onions and do the same. Turn heat down to low and let the onions steep until they re-hydrate a bit. Voila, you’re ready to serve.

Well, that’s it for this time.

I’ll see if I can’t come up with something a little more elaborate and along the lines of ‘real cooking’ for next time.

Until then,

Y’all take care,

Chris

Friday, August 20, 2010

Moorish Pork Kabobs


The wife bought me a grilling magazine recently, and its section on Tapas brought back memories of lounging on the Costa Del Sol in Spain, sipping cerveza and nibbling on the delicious little appetizers they brought out with each beer. That’s the nice thing about Spain. You get a little something extra to munch on with your drink. Another wonderful thing about Spain is the influence that Morocco has had on its cuisine, especially in the south. The exotic middle eastern spices have made their way into many of Spain’s tapas offerings, and this Moorish Pork Kabob recipe from the grilling magazine was reminiscent of some of the more tasty tapas treats I had in Spain.


Moorish Pork Kabobs

1 pound pork tenderloin
1 tablespoon dried oregano, crushed
1 tablespoon granulated garlic powder
1 teaspoon ground coriander
2 teaspoons Spanish paprika
½ teaspoon salt
½ teaspoon dried thyme, crushed
1/8 teaspoon cayenne pepper
2 tablespoons olive oil
1 tablespoon lemon juice

Trim fat from meat and cut the meat into 1 to 1½ in pieces.

Place meat into a resealable plastic bag. In a small bowl, combine oregano, garlic, coriander, paprika, salt, thyme and cayenne pepper.

Sprinkle mixture over meat. Turn bag back and forth and rub mixture into meat. Add olive oil and lemon juice, seal bag and turn to coat meat. Marinate in the fridge for 2 to 8 hours.

Thread meat on skewers, leaving a half inch between pieces.

For a charcoal grill, place meat skewers on the grill rack directly over medium coals.
 
Grill for 12-15 minutes until meat is slightly pink in center, turning occasionally to brown evenly.
 
For such a relatively simple preparation, these babies came out great.  The pork was juicy and tender, and the spice blend was pungent and exotic, with just a mild tinge of heat to keep you interested. 
 
Give 'em a try.
 
Until next time,
 
A Sante'
 
Chris

Saturday, August 14, 2010

Berry Picking South of London


Berries are perhaps some of my favorite fruits. Popping a delicious, succulent blackberry or strawberry in my mouth is not only a treat, but it brings back childhood memories of wandering along the edge of the woods in East Texas, picking berries by the bucket-full, and enjoying them with sugar and milk later that night.

A few years back, my friend Les and I were visiting some friends in London. Being as Les is a farmer by trade (shameless plug...Richardson’s Farms in Maryland) we often find ourselves checking out farmer’s markets or other rural locales, so on this particular trip we ended up at a pick your own berry farm.

The thing that makes this of interest is that this particular farm grew Tayberries–Something I’d never heard of before. Turns out the Tayberry is a cross between a blackberry and a red raspberry, and the purplish-red fruit is about twice the size of either parent.

It also turns out that this little guy is packed with flavor, rich tangy flavor that is reminiscent of both parent fruits. It was perhaps not as sweet as a fully ripe blackberry, but not as tart as the raspberry. All in all it was a great little discovery, and I thought I’d share a few pictures of the experience.

Les and Natasha picking away.

The obligatory pint at the pub after a hard day of berry picking.


Freshly Picked Tayberries, ready to eat.

The tayberries went well with a nice wine and cheese course before dinner. 

I also saw these little guys at Central Market recently (the first time other than the berry farm that I’d come across them) but at the exorbitant prices they were charging, I would almost rather fly back to England to get some. But, if you come across some, check ‘em out.

Until next time,

I hope you're berry happy,

Chris